Backlighting Translucent Glass Panels: Don’t Forget Diffusion Techniques
Thinking of designing a backlit glass bar or countertop? It’s not quite as easy as just placing a light source behind the glass. There are many details that can slip through the cracks in backlit architectural features, and when the lighting system is sloppy, the time and investment that you’ve put into the surface is rendered useless.
Particularly when the glass panels and the backlighting system are provided by two different companies, it is often unclear who is responsible for these seemingly secondary items (attachment methods, diffusers, accountability for the final look). But it’s really those details that make your backlit feature sink or swim. The most overlooked item when backlighting glass panels is diffusion. It’s one of those items that often slides through the design and construction process unnoticed.
A few important tests can ensure that your backlit glass designs perform to your expectations. We’ll use this recent project as an example: the designer wanted to seamlessly illuminate vivid blue glass panels from Jockimo. The glass specifications, color, and patterning were already set. The Jockimo glass sample was sent to our Design Lab here at GPI to determine the best illumination and diffusion strategy. Based on the custom LED light panel design (LED panel sizes, color temperature, spacing between LED bulbs), GPI was able to quickly generate a light diffusion strategy that complemented both the glass panels and the construction assembly.
- When placed in direct contact with the LED light panel as shown below, the hot spots (bright edges) were quite visible. (Distracting, muddled look – doesn’t do justice to the beauty of the glass.)
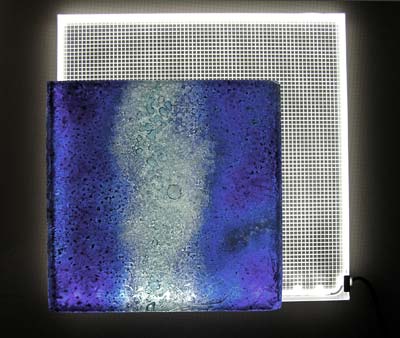
Backlit Glass Assembly Before Diffusion: Hot Spots at Edges, Cold Spots at Center
- As time was of the essence, we didn’t want to increase lead time by altering the glass panel specifications with the addition of interlayers or frosted treatments. (Cross those methods off the list.)
- To keep the countertop assembly as simple as possible without adding thickness, the glass surface needed to rest directly on top of the LED light panel. That meant that we couldn’t rely on the air space cavity for diffusion. (Cross that method off the list.)
- We tested optical acrylic diffusing panels, but even with a slim 3/16” gauge, the added thickness was not desired. (Acrylic diffusion panels won’t work here, scratch that.)
- The outcome: a specialty diffusion film was applied directly to the face of the LED panels. The corrective film blends the light and even brightens up the saturated blue colors. We applied the film using varying pressures that balance the LED panel lighting into a truly seamless plane of light. The LED light panels were shipped with the film applied, ready for easy on-site construction by the installation team.
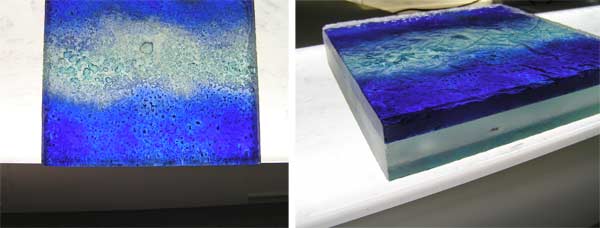
Backlit Glass Assembly After Diffusion Film: Continuous Plane of Light, Saturated Glass Coloration
VOILA! The custom solution for evenly illuminated glass countertops– with our integrated methods, a few simple testing iterations allowed us to preserve the designer’s vision.
Stay tuned for final installation photographs!